
Hey there! As a supplier of Fully Welded Ball Valves, I've had my fair share of customers asking about the installation requirements for these valves. So, I thought I'd put together this blog post to break it all down for you.
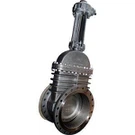
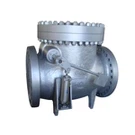
First off, let's talk a bit about what a Fully Welded Ball Valve is. A Fully Welded Ball Valve is a type of valve that has a ball-shaped disc inside it. The ball has a hole in the middle, and when the valve is open, the hole aligns with the pipeline, allowing fluid to flow through. When the valve is closed, the ball is rotated so that the hole is perpendicular to the pipeline, blocking the flow. You can learn more about them here: Fully Welded Ball Valve.
Now, let's get into the installation requirements.
1. Site Preparation
Before you even think about installing a Fully Welded Ball Valve, you need to make sure the installation site is ready. The area where the valve will be installed should be clean and free of any debris, dirt, or other contaminants. This is crucial because any foreign particles can get into the valve and cause damage or affect its performance.
The pipeline where the valve will be connected also needs to be in good condition. Check for any signs of corrosion, cracks, or other damage. If there are any issues, they should be fixed before the valve is installed.
2. Valve Selection
Choosing the right Fully Welded Ball Valve for your application is super important. You need to consider factors like the type of fluid that will be flowing through the valve, the pressure and temperature of the system, and the size of the pipeline.
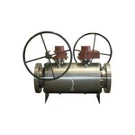
For example, if you're dealing with a high-pressure system, you'll need a valve that can handle that pressure. There are different types of ball valves, such as Seated Ball Valve and Trunnion Mounted Ball Valve, each with its own features and capabilities. Make sure you pick the one that's best suited for your needs.
3. Installation Tools
You'll need the right tools to install a Fully Welded Ball Valve. Some of the common tools include wrenches, welding equipment (since it's a fully welded valve), and measuring tools.
The wrenches are used to tighten the bolts and connections. Make sure you use the correct size wrenches to avoid damaging the valve or the pipeline. The welding equipment is used to weld the valve to the pipeline. This requires proper training and safety precautions, as welding can be dangerous.
The measuring tools, like a tape measure or a caliper, are used to ensure that the valve is installed at the correct position and that the connections are properly aligned.
4. Valve Installation
Once you have everything ready, it's time to install the valve. Here are the general steps:
- Positioning: First, position the valve in the pipeline. Make sure it's aligned correctly with the pipeline and that the flow direction of the valve matches the flow direction of the pipeline. You can use the measuring tools to double-check the alignment.
- Welding: If the valve is a fully welded type, you'll need to weld it to the pipeline. This should be done by a qualified welder. The welding process needs to be carried out according to the manufacturer's instructions and relevant welding standards.
- Tightening Connections: After welding, you'll need to tighten the connections. Use the wrenches to tighten the bolts evenly. Make sure not to over-tighten, as this can damage the valve or cause leaks.
5. Testing
After the valve is installed, it's important to test it to make sure it's working properly. You can do a pressure test to check for any leaks. The pressure test should be carried out at the appropriate pressure level for your system.
If there are any leaks, you'll need to find the source and fix it. This could involve tightening the connections further or re-welding if necessary.
6. Maintenance and Inspection
Once the valve is installed and tested, you need to establish a regular maintenance and inspection schedule. This will help ensure the long-term performance and reliability of the valve.
Regularly check the valve for any signs of wear, corrosion, or damage. You should also lubricate the moving parts of the valve as recommended by the manufacturer.
7. Safety Precautions
Throughout the installation process, safety should be your top priority. Wear appropriate safety gear, such as gloves, safety glasses, and a welding helmet if you're doing the welding.
Make sure the area is well-ventilated, especially when using welding equipment. And always follow the safety instructions provided by the manufacturer and relevant safety standards.
In conclusion, installing a Fully Welded Ball Valve requires careful planning, the right tools, and proper techniques. By following these installation requirements, you can ensure that your valve is installed correctly and will perform well for a long time.


If you're in the market for a Fully Welded Ball Valve or have any questions about installation or other aspects, don't hesitate to reach out. We're here to help you find the best solution for your needs. Whether you're a small business or a large industrial operation, we've got the expertise and the products to meet your requirements.
References
- Valve Installation Manuals from Valve Manufacturers
- Industry Standards for Valve Installation and Maintenance