Maintenance of pneumatic butterfly valve during use
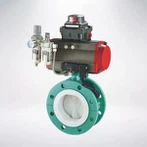
The composition of pneumatic butterfly valve is divided into two parts, namely pneumatic actuator and butterfly valve. The pneumatic butterfly valve uses a circular butterfly plate that rotates with the valve stem for opening and closing. The pneumatic valve that realizes the activation action is mainly used as a cut-off valve. It can also be designed to have the function of adjustment or segment valve and adjustment. At present, the butterfly valve is at low pressure and large The use of medium-diameter pipes is increasing.
The working principle of pneumatic butterfly valve The butterfly plate of the butterfly valve is installed in the diameter direction of the pipeline. In the cylindrical passage of the butterfly valve body, the disc-shaped butterfly plate rotates around the axis, and the rotation angle is between 0°-90°. When the rotation reaches 90°, the valve is in a fully open state. The butterfly valve is simple in structure, small in size and light in weight, and consists of only a few parts. Moreover, it can be opened and closed quickly by rotating 90°, and the operation is simple. At the same time, the valve has good fluid control characteristics. When the butterfly valve is in the fully open position, the thickness of the butterfly plate is the resistance when the medium flows through the valve body, so the pressure drop generated by the valve is small, so it has better flow control characteristics. The butterfly valve has two sealing types: elastic seal and metal seal. Elastic sealing valve, the sealing ring can be inlaid on the valve body or attached to the periphery of the butterfly plate.
Pneumatic butterfly valve maintenance and debugging. Cylinder inspection and maintenance plan. Clean the surface of the cylinder and refuel the cylinder shaft circlip. Every 6 months, open the cylinder end cover to check whether there is debris and moisture in the cylinder, and the state of grease. If the grease is missing or dry, the cylinder must be disassembled for thorough maintenance and cleaning before adding grease. Valve body inspection Every 6 months, check whether the valve body is good in appearance and whether the mounting flange is leaking. If it is convenient to check whether the valve body is well sealed, there is no wear, and whether the valve plate operates flexibly and whether the valve is stuck with foreign objects.
Cylinder block disassembly and assembly methods and matters needing attention:
First remove the cylinder from the valve body, first remove the cover at both ends of the cylinder, pay attention to the direction of the piston rack when removing the piston, then use external force to rotate the cylinder shaft clockwise to make the piston run outside, and then close the valve hole Ventilate slowly and gently push the piston out with air pressure. But this method must pay attention to slowly ventilating, otherwise the piston will suddenly eject, which is a bit dangerous! Then remove the circlip on the cylinder shaft, and the cylinder shaft can be taken out from the other end. Then you can clean each part and add grease. The parts that need to be greased are: the inner wall of the cylinder and the piston sealing ring, the rack and the back ring, as well as the gear shaft and the sealing ring. After the grease is added, it must be installed in the order of disassembly and the reverse order of parts. After installation, the order of disassembly and parts must be installed in the reverse order. Pay attention to the position of the rack and pinion. Make sure that the piston is retracted when the valve is opened. The upper end groove of the gear shaft is parallel to the cylinder block when the position goes inside, and the upper end groove of the gear shaft is perpendicular to the cylinder block when the piston extends to the outside position when the valve is closed.
Cylinder and valve body installation and debugging methods and matters needing attention:
First put the valve in the closed state with external force, first put the valve in the closed state with external force, that is, rotate the valve shaft clockwise until the valve plate is in sealing contact with the valve seat, and at the same time put the cylinder in the closed state (that is, the upper part of the cylinder shaft is small). The groove is perpendicular to the cylinder, and the valve is closed when it rotates clockwise). Then install the cylinder to the valve (the installation direction is either parallel or perpendicular to the valve body), and then check whether the screw holes are aligned, there will not be too much deviation, if there is a slight deviation, just rotate the cylinder body a little, and then Tighten the screws. Pneumatic butterfly valve debugging first check whether the valve accessories are installed, solenoid valves and so on. If there are not complete, do not debug. The normal supply pressure is 0.6MPA±0.05MPA. Before operation, make sure that no debris is stuck in the valve plate in the valve body. Manually operate the solenoid valve manual button during the first commissioning operation (when the solenoid valve coil is de-energized during manual operation, manual operation is effective; when the electric control is operated, turn the manual switch to the 0-position circle and the manual operation is effective; 0-position is off For the valve, the first position is the open valve, that is, the valve is opened when the power is turned on. If the valve is turned off when the power is off, the valve is closed when the power is turned off. The solenoid valve coil can be installed by rotating 180 degrees), and observe the valve operation status.